
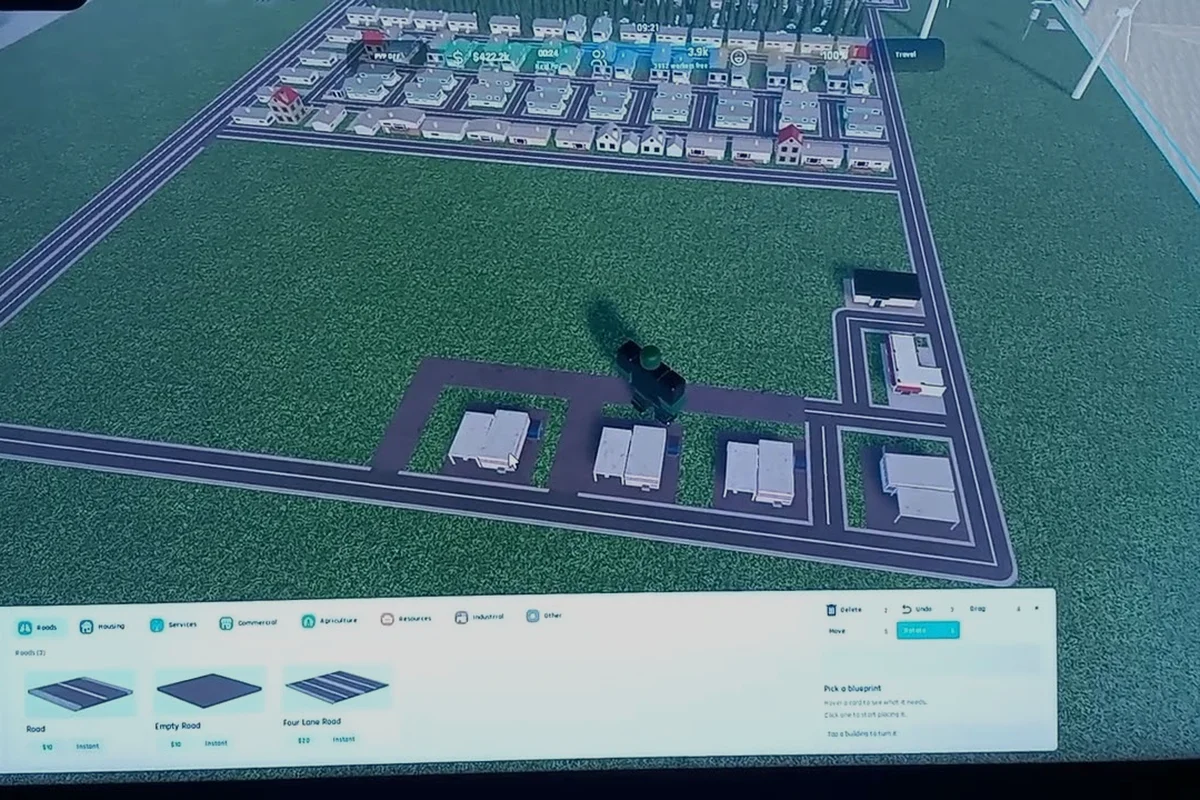
Speed matters in Build and Conquer. The fastest buildings to build in Build and Conquer are the structures that stabilize your cash flow, push your population counter upward, and let your city expansion buildings chain together without burning through the early budget. The cheap suburban houses, supermarkets, and mid-rise apartments sit at the top of that list because they pay for themselves in a few in-game days, freeing resources for the heavier industrial and power projects that come later in the V0.1 beta.
The cheapest buildings to place in the opening hours of a save are the tier-one residential lots. A small suburban house costs only a fraction of your starting treasury, and once you connect it to a road tile it begins housing workers almost immediately. That early income is what lets you keep building. From there, layering in shops, a supermarket, and a small factory tightens the loop so every structure you drop is feeding the next one. This guide breaks down which structures lead the speed race, how to lay them out with the cheapest road network design you can manage, and when to upgrade into high density housing without stalling your city expansion buildings.
Cheapest Tier-1 Structures and Why They Win the Opening Hours
The first hour of a new save in Build and Conquer is a sprint against the bank. Every dollar matters, so the cheapest buildings are the only realistic option until the treasury stabilizes. In the V0.1 beta, three structure families sit at the bottom of the cost ladder and still deliver useful output.
Small Suburban House
The Small Suburban House is the single cheapest residential structure in the game. It holds a small number of residents, but its real value is how quickly it can be placed: one click, a short build timer, and it is online. Drop a row of three or four along a single road segment and you have a steady trickle of workers that can staff nearby shops and factories. The structure also pairs well with the housing buildings breakdown because both share the same road-connection rules.
Corner Shop and Convenience Store
The Corner Shop is the cheapest commercial structure and acts as the bridge between a sleeping residential block and a real economy. Workers walk from the suburban houses to the shop, which generates a small but reliable stream of revenue each in-game day. The Convenience Store sits one tier above it but costs only marginally more, which makes it a strong upgrade when you have a little surplus cash on hand. Both structures are short timer builds, so they enter revenue service almost as fast as the houses that surround them.
Small Road Tile
The Small Road Tile is technically infrastructure, not a building, but it is the cheapest way to unlock the rest of your city. Roads must connect a structure to the rest of the network or it will not function. Laying a basic grid early keeps the rest of your build order cheap because you avoid the rework cost of tearing up an unconnected block. The road network design you start with dictates how fast every later structure comes online, which is why experienced players place road tiles in straight parallel rows rather than curving them through empty terrain.
| Tier-1 Structure | Approx. Cost | Build Time | Primary Output |
|---|---|---|---|
| Small Suburban House | Lowest | Very short | Population + workers |
| Corner Shop | Low | Very short | Daily revenue |
| Convenience Store | Low–Medium | Short | Revenue, light jobs |
| Small Road Tile | Lowest | Instant | Connectivity |
High Density Housing and Mid-Rise Apartments for Faster Population Growth
Once the cheap tier-1 buildings have stabilized cash flow, the next speed target is population. Build and Conquer's mid-tier housing structures pull more residents per tile, which means your high density housing blocks add workers faster than another row of suburban houses would. The community-reported numbers from the V0.1 beta place the Mid-Rise Apartment at roughly 32 residents, climbing to about 48 after the first upgrade pass, making it the densest residential structure available before the late-game skyscrapers unlock.
Mid-Rise Placement in the Dense Housing Push
The Mid-Rise Apartment is the centerpiece of the high density housing push. It costs more than a suburban house, but it covers a comparable footprint while housing nearly an order of magnitude more people. Because the structure is taller, it needs a small power feed, which is where planning your power grid layout ahead of time pays off. Place the apartment block within two tiles of a coal or small power plant and you avoid the need to extend transmission lines later.
Apartment Block Upgrade Path
Upgrading a Mid-Rise Apartment costs less than building a second one from scratch, and the upgrade lifts the population cap from 32 to 48 according to community testing. The trick is to upgrade only after the building is fully staffed and generating its daily tax income, so the cash to fund the upgrade is already in the treasury. If you upgrade too early, you stall the broader city expansion buildings program because the apartment temporarily drops out of revenue service during the upgrade timer.
Townhouse Row
The Townhouse Row is the cheaper middle ground between the suburban house and the Mid-Rise Apartment. It costs less than a Mid-Rise but houses more residents than a single Suburban House, and it is a useful stepping stone for players who do not yet have the power grid to support a full apartment. The structure is also flexible: you can place a row of Townhouses, wait for them to fill, then demolish and rebuild with a Mid-Rise on the same footprint once your power grid layout can support the larger building.
| Housing Type | Population (Base) | Population (Upgraded) | Power Need |
|---|---|---|---|
| Small Suburban House | ~4 | ~6 | None |
| Townhouse Row | ~12 | ~18 | None |
| Mid-Rise Apartment | ~32 | ~48 | Small feed |
| High-Rise (late unlock) | ~60+ | ~80+ | Heavy feed |
Commercial Anchors: Supermarket and Mall as Fastest Buildings to Build
Residential blocks without commerce are dead weight. The fastest buildings to build in the commercial category are the Supermarket and the Mall, and both are common picks in community footage of the V0.1 beta. A supermarket acts as a steady money maker that bankrolls early expansion, while a mall is a heavier but still fast structure that can be the financial engine of an entire district.
Supermarket Placement Strategy
A supermarket should be placed at the intersection of two residential roads so workers from multiple blocks can reach it within a few seconds of walking. Because supermarkets are flagged as commercial anchors, they raise the land value of nearby tiles, which in turn boosts the rent collected from adjacent houses. Placing a supermarket first and then building housing around it is faster than the reverse, because the housing fills immediately. The structure costs more than a corner shop but pays back the difference within a handful of in-game days at typical residential density.
Mall as a District Engine
The Mall is a heavier commercial anchor and one of the city expansion buildings that defines a district. It costs substantially more than a supermarket and needs a stronger road connection, but the revenue per day justifies the investment once a mid-sized residential cluster surrounds it. Malls also create commercial jobs, which in turn raise the demand for housing in nearby blocks. Building a mall on a fresh expansion tile is one of the fastest ways to convert empty land into a working district, because the mall pulls shops, restaurants, and offices into the area as land value climbs.
| Commercial Structure | Cost Tier | Build Time | Best Use |
|---|---|---|---|
| Corner Shop | Lowest | Very short | First revenue per block |
| Convenience Store | Low | Short | Upgrade from Corner Shop |
| Supermarket | Medium | Short | District revenue anchor |
| Mall | High | Medium | District engine, land value |
Power Grid Layout and Road Network Design for Fast Expansion
Speed in Build and Conquer is not just about which building you place, it is about how those buildings connect. A weak power grid layout or a fragmented road network design will silently slow every later structure, because disconnected buildings sit idle and idle buildings do not pay for themselves. The fastest expansion routes always pair a tidy road grid with a small, reliable power source placed before the high density housing goes down.
When evaluating production rates and build timers for the cheapest structures in the early game, community-tested footage on the Build and Conquer fastest buildings to build search results page provides a useful cross-check against the in-game economy tables.
Coal Power Plant and Early Power Grid Layout
The Coal Power Plant is the cheapest power source that can feed a small cluster of mid-tier buildings, and it is the workhorse of the early power grid layout. A single coal plant can support a small ring of mid-rise apartments plus a supermarket, which is enough to bootstrap a first district. The plant has a short build timer, and once online it provides enough transmission range to cover a tight grid of city expansion buildings. Building the plant first, then laying the apartments around it, is faster than building the apartments first and then trying to thread power lines back to them.
Small Transformer and Transmission Planning
The Small Transformer is the bridge that lets you push power from a single plant across a wider footprint. Place transformers at regular intervals along your main road, then run short transmission spurs into the housing blocks they feed. The pattern keeps your power grid layout tidy and means you can extend service to a new expansion tile by dropping a single transformer rather than building a second plant. As you scale toward the Nuclear Power Plant later, the same transformer pattern still applies, which is why the power plant guide walks through the upgrade path from coal to nuclear using identical tile logic.
Road Network Design Patterns
The cheapest road network design is a grid. Parallel roads running north-south, crossed by parallel roads running east-west, give you rectangular blocks that fit every structure family. Curved roads look nicer but waste tiles and force awkward gaps where buildings will not sit. The fastest build order is to lay a four-by-four grid of road tiles first, then drop suburban houses on the inside blocks, a supermarket at the central intersection, and a coal plant one tile off the corner. That single layout can carry you through the first hour of city expansion buildings before you need to extend the grid further.
| Layout Element | Cheapest Option | Faster Build Tip |
|---|---|---|
| Road pattern | Straight grid | Lay grid before buildings |
| Power source | Coal Plant | Build plant before apartments |
| Power distribution | Small Transformer | One transformer per block |
| Service coverage | Water Tower (early) | Place near residential core |
Factory, Industrial Anchors, and When to Build Them
The cheapest buildings carry the opening, but the long-term economy runs on industry. A small Factory is the cheapest industrial structure that produces useful output, and it is also one of the fastest buildings to build once you have a basic grid in place. Factories feed the steel and vehicle output that the late-game economy needs, so dropping one early means the rest of your supply chain is already warm when the heavier projects come online.
Small Factory Output and Timing
A small factory produces raw goods at a steady rate and exports them for daily income, which is the most reliable form of revenue in the V0.1 beta. Place it downwind of your residential core so pollution does not drag down land value, and connect it to the main road grid with a short spur. The factory has a moderate build timer but no population requirement, so it can be placed before your housing is full. Once it is online, the daily income it generates is often larger than the combined output of two or three supermarkets, which is why it climbs the fastest buildings to build list as soon as the residential core is stable.
Industrial Park Scaling
After the first factory is profitable, scaling into an industrial park is one of the fastest paths to a serious treasury. Lay a second road grid two tiles away from the residential core, drop two more factories, and connect them with a service road. Because the industrial park sits outside the residential grid, the cheaper road network design used for the housing blocks does not need to extend that far. The industrial park also pulls truck traffic, which in turn increases the value of nearby logistics buildings. If you want a fuller picture of where factories sit in the broader economy, the best income buildings breakdown ranks the factory alongside other top earners.
Civil Defense Before Late-Game Threats
Once your treasury is healthy, the next speed target is civil defense. The Bunker and the Air Raid Siren are the two civil defense structures that protect your city expansion buildings from late-game attacks. According to community reports, both structures are relatively cheap to place and quick to build, and they are most effective when spread across the residential core rather than clustered at one edge. The air raid siren in particular has a short radius, so dropping one per district is faster than trying to cover the whole city with a single siren. Pairing the bunker with the siren and a small power feed turns a soft target into a defended one without slowing your broader build pace.
Fastest Build Order for the First 30 Minutes
A clean opening build order is the single biggest speed advantage in Build and Conquer. The order below is tuned for the V0.1 beta and assumes you start with the standard starting treasury.
| Step | Structure | Reason |
|---|---|---|
| 1 | 4× Small Road Tile | Unlock connectivity |
| 2 | 4× Small Suburban House | Cheapest population |
| 3 | 1× Coal Power Plant | Powers mid-tier buildings |
| 4 | 1× Small Transformer | Extend power to next block |
| 5 | 2× Mid-Rise Apartment | High density housing |
| 6 | 1× Supermarket | District revenue anchor |
| 7 | 1× Small Factory | Industrial income |
| 8 | Extend road grid by 4 tiles | Prepare next expansion |
| 9 | 1× Townhouse Row | Cheaper mid-tier housing |
| 10 | 1× Mall | District engine |
This sequence keeps every structure earning within minutes of placement, and it threads the power grid layout together before any of the heavy industrial or commercial anchors go down. By minute 30, the city expansion buildings in the core should be self-funding, and the next district can be bootstrapped using the same pattern. The city level expansion guide covers how this build order feeds into the broader level gating system, but the core idea is the same: a stable residential base, a small industrial anchor, and a clean power grid.
Frequently Asked Questions
What is the single fastest building to place in Build and Conquer?
The Small Suburban House is the fastest structure to place because it has the lowest cost, the shortest build timer, and no prerequisites. A row of four houses along a single road tile will be fully staffed and generating tax income within the first few in-game days, making it the cleanest opening move for any save.
Are mid-rise apartments worth the higher cost?
Yes, once your power grid layout can feed them. A Mid-Rise Apartment houses roughly 32 residents at base and about 48 after the first upgrade, which is a far better population per tile ratio than suburban houses. They cost more up front, but the per-resident tax income means they pay back the difference in a modest number of in-game days at typical density.
How many supermarkets should I build per district?
One supermarket per mid-sized residential cluster is the standard ratio, because a single supermarket can serve a tight grid of high density housing without long walking commutes. If a district is wider than four tiles, drop a second supermarket at the far intersection to keep walking times short, since longer walks slow worker turnover and drag down the daily revenue of nearby shops.
Do I need a nuclear power plant to expand?
No, a single Coal Power Plant paired with a few Small Transformers is enough to power an early-to-mid game city. The nuclear plant only becomes necessary once you start placing high density housing at scale or running heavy industrial districts, so save the nuclear build for after your city expansion buildings are already paying for themselves.
What is the cheapest road network design?
The cheapest pattern is a straight grid of parallel road tiles, with no curves and no dead ends. Curved roads waste tiles and force awkward gaps that buildings will not fill, while a clean grid gives every structure family a place to sit and keeps the power grid layout simple because transformers can be placed at regular intersections.