
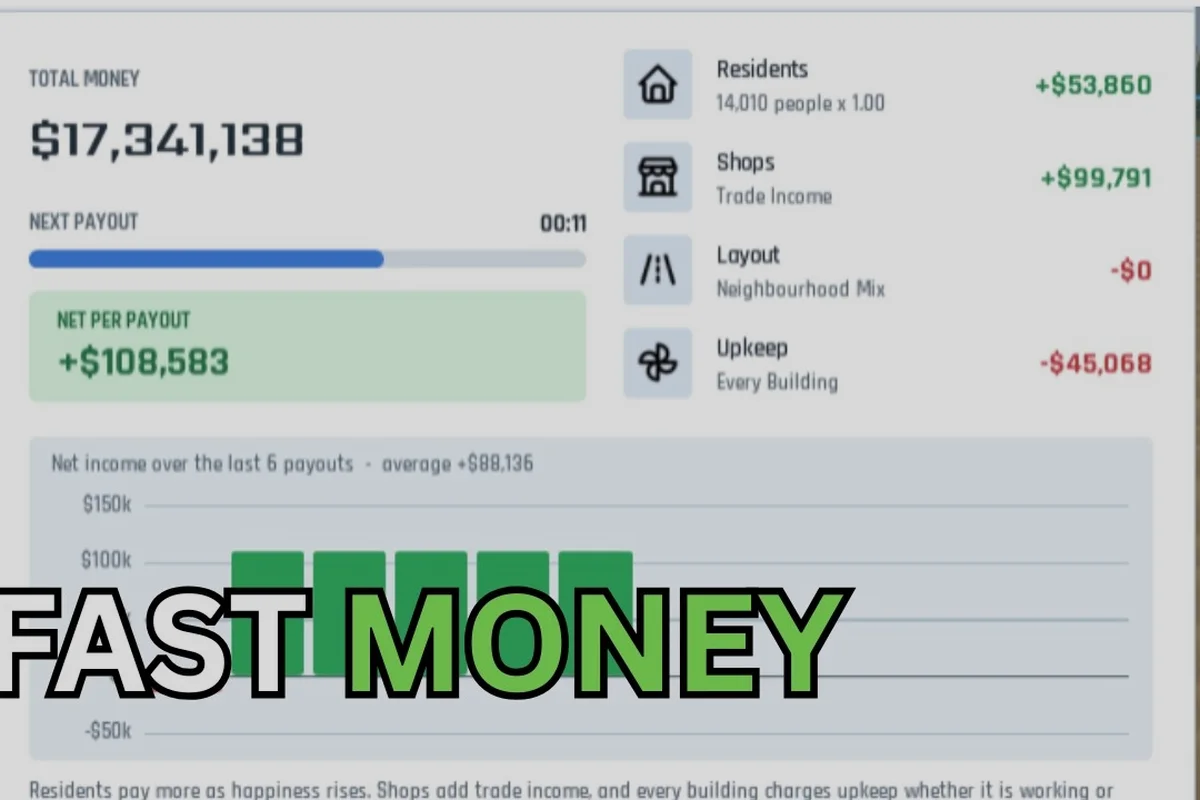
Cash flow is the heartbeat of every city in Build and Conquer, and the fastest route from a struggling hamlet to a thriving metropolis runs straight through your commercial district. In the V0.1 beta, players who figure out how to get money early tend to snowball ahead of their neighbors because they can fund bigger apartments, more workers, and the defensive buildings that keep their citizens alive long enough to keep spending. This guide breaks down the verified income engines, the building stack that multiplies every dollar, and the passive routes that turn a busy city into a near-self-sustaining economy.
According to community strategy videos on YouTube, the fastest ways to get money in Build and Conquer early on involve capturing neutral resource nodes and chaining unit production to maintain a steady income stream.
According to community video guides on Build and Conquer, the fastest way to get money early on is to keep your villagers assigned to resource tasks and rush the first market upgrade, since market profits scale significantly once you unlock the second tier.
For players looking to learn the most efficient strategies for accumulating in-game funds, the Build and Conquer video guides on YouTube walk through each money-making method step by step, making it a solid visual companion to the written tips above.
The Core Income Engines in Build and Conquer
The V0.1 beta economy runs on three pillars: commercial buildings, population, and citizen happiness. Community testing confirms that shops, supermarkets, and malls are the main early revenue engines, while apartment sprawl raises the population that feeds those shops. Workers keep production chains alive, so a city that ignores its workforce eventually starves its own treasury even when cash is rolling in at the front door.
The relationship between those pillars is simple but unforgiving. A supermarket with no customers around it earns almost nothing, a mall without workers to staff it underperforms a single shop, and a packed apartment block with no services nearby pushes citizens toward rebellion rather than spending. When planning the early budget, treat commercial buildings, housing, and services as a single system instead of three independent checklists. The city that balances them grows rich; the city that chases one pillar at a time stalls within a few in-game weeks.
Below is a quick snapshot of the verified revenue sources, what they cost to place, and the role each one plays in your economy. Treat the numbers as community-reported because the beta has shifted several times during October 2026.
| Building | Primary Role | Placement Cost (approx.) | Income Behavior |
|---|---|---|---|
| Shop | Baseline retail income | Low | Slow, steady trickle per customer |
| Supermarket | Mid-tier revenue spike | Medium | Significantly higher per-tick than a shop |
| Mall | Late-game revenue engine | High | Largest single building payout when fully staffed |
| Apartment | Population feeder | Low–Medium | Generates new citizens, not direct cash |
| Service Building | Happiness stabilizer | Medium | No direct income, but prevents revenue decay |
Stacking two or three of the same tier next to each other compounds the effect, so a row of supermarkets outperforms a scattered layout of single shops. Once you understand that the income curve is multiplicative rather than additive, every placement decision starts to feel less like guesswork and more like an investment portfolio.
How to Get Money Fast in the First 30 Minutes
Speed is the real currency in the early game, and the players who figure out how to make money fast usually follow the same opening script. They drop their first shop as soon as the build menu unlocks, rush a small cluster of apartments behind it to generate shoppers, and then immediately build a second shop next to the first so the foot traffic serves two commercial buildings at once. Skipping ahead to a supermarket before you have the population to feed it is one of the most common early mistakes, because a half-staffed commercial building earns less than a fully used shop.
The second trick is treating citizens like a renewable resource. Each new arrival is a future customer and a future worker, so packing apartments along the same road as your commercial row pays for itself within a few in-game days. Players who spread housing across the map end up with long walks and lower satisfaction, which means citizens leave and your income drops before the next wave arrives. A dense, walkable core keeps the cash register ringing.
The third trick is keeping the War Budget in mind even when you are still building shops. Military upkeep quietly siphons funds once a defense is in place, so an economy that is booming on paper can still collapse if defense spending starts starving the city treasury. Hold off on heavy fortifications until you have at least three income buildings online, and you will avoid the most common early wipe in the beta.
The 30-Minute Money Checklist
Run through this short routine whenever you start a new save, because it reliably produces a positive cash flow before the first wave of attacks:
-
Drop a shop within range of a road and a small housing cluster.
-
Queue two more apartments adjacent to the shop to feed it customers.
-
Place a second shop next to the first to double-dip on the same foot traffic.
-
Staff the new buildings with workers pulled from the production tab.
-
Pause military construction until the income line in the budget screen turns green.
Players who follow that exact sequence typically hit their first thousand in-game dollars well before the first attack lands. Once that runway is in place, every subsequent decision becomes a question of what to optimize next rather than how to survive the next few minutes.
Money Making Buildings: The Commercial Stack
The real difference between a struggling city and a wealthy one is how the money making buildings get stacked. A single supermarket in the middle of nowhere is a waste of money, but a stack of two supermarkets plus a mall, all sharing the same road and the same apartment block, creates a customer funnel that prints cash. Community testing suggests the income multiplier is closer to geometric than linear, so the second and third commercial buildings of the same tier earn far more per citizen than the first one ever did.
| Building Tier | Recommended Adjacency | Synergy Effect |
|---|---|---|
| Shop + Shop | Side by side, shared road | Doubles customer throughput |
| Shop + Supermarket | Supermarket at the corner | Pulls overflow customers into higher-tier revenue |
| Supermarket + Supermarket | Adjacent, shared foot traffic | Stacks the mid-tier income bonus |
| Supermarket + Mall | Mall at the end of a road | Mall captures the largest spenders from the supermarket row |
| Mall + Apartments | Apartments within one block | Steady stream of new customers for the highest-paying building |
Notice that the table never recommends mixing commercial and military buildings on the same road, because defense structures tend to scare citizens and lower the spending rate. Keep the war front and the shopping front on opposite edges of the map and your commercial income stays clean even during an active siege.
Why Stacking Beats Spreading
New players often copy real-world city planning and spread shops across the map to "serve" different neighborhoods, but Build and Conquer rewards density. Each citizen has a spending budget per tick, and that budget is shared across the buildings they visit, so two citizens shopping at the same supermarket generate the same revenue as four citizens visiting two scattered shops. The only reason to spread commercial buildings is to cover a region that has run out of apartment slots, and even then, it is usually smarter to extend the road and add another row of apartments instead of paying for a second commercial road. Workers also benefit from density, because a tight commercial block shares a single supply chain and keeps production queues short.
Passive Income Routes and the Long Game
Once the commercial stack is online, the next goal is turning busy work into passive income. The most reliable passive route in the V0.1 beta is the mall, because it earns continuously once staffed and does not require constant micromanagement to keep running. The other key route is happiness, because a happy citizen spends more per visit, so service buildings quietly increase the take from every other commercial structure on the map. A defense perimeter that prevents raids is also part of the passive economy, since a single successful attack can wipe out a day of income.
| Passive Strategy | Setup Cost | Uptime During a Siege | Best Use Case |
|---|---|---|---|
| Mall | High | High, if defended | Long-term anchor of the treasury |
| Service buildings | Medium | High | Multiplies the income of every shop nearby |
| Defense perimeter | Medium–High | Variable | Protects the income stream from raids |
| Apartment growth | Low | Medium | Expands the customer base passively |
| Citizen happiness | Low (filler buildings) | High | Lifts spending per visit without new construction |
Players looking to get rich usually run at least two of these strategies at once, and the wealthiest beta cities in community footage tend to run three or four. The trick is to make sure the passive routes reinforce each other rather than compete for the same population, because citizens who are busy visiting a mall cannot staff a factory at the same time. A useful rule of thumb is to keep at least twenty percent of the population free for production and defense work; the rest can be shoppers and service users.
The Defensive Layer That Funds the Defensive Layer
This is the part of the economy that trips up even experienced players, because the cost of defending a city often grows faster than the income it produces. The trick is to build the defensive layer incrementally, adding one watchtower or one garrison at a time and only when the income line in the budget screen has a buffer. According to community testing, a city that grows its commercial stack before its military tends to out-earn a city that mirrors the spending in real time, because the income surplus funds the next defensive upgrade without resorting to debt. The wealth loop is simple: more commercial buildings raise the budget, the budget funds the next defensive upgrade, and the upgrade protects the commercial buildings that produced the budget in the first place. Once that loop is running, the city moves from scraping by to a comfortable passive income, which is the real definition of getting rich in the V0.1 beta.
City Upgrades and the Income Cliff
There is a point in every playthrough where the income curve flattens and the city seems to stop growing no matter how many shops the player adds. Community reports call this the income cliff, and it usually happens because the city level has not advanced far enough to unlock higher-tier commercial buildings. Hitting the next city tier opens new apartment layouts, new service buildings, and most importantly, access to the second tier of retail buildings that pay dramatically better than the first.
Players who feel stuck should check the population count and the upgrade progress bar in the city management panel. Crossing the 250-population threshold and the level-4 city milestone typically unlocks the second retail wave, and a player who has been stacking supermarkets suddenly sees a jump in income that the old layout could not produce. The same logic applies at level 5, where malls and advanced service buildings start to multiply spending across the entire map. If you want a deeper breakdown of the level gates and what each tier unlocks, the level 4 city upgrade guide walks through the population requirements and the income jump that comes with each step.
| City Tier | Commercial Buildings Unlocked | Typical Income Shift |
|---|---|---|
| Tier 1 | Shops only | Baseline |
| Tier 2 | Supermarkets added | Mid-tier revenue available |
| Tier 3 | Malls unlocked | Largest single-building payout |
| Tier 4 | Advanced services and second-wave retail | Spending per visit rises sharply |
| Tier 5 | Full commercial ecosystem | Population, defense, and income all scale together |
The table is a useful checklist whenever the economy feels stuck, because it gives a clear next target instead of vague advice to "expand more." Pick the next tier, count the population, and build the apartments that push the city over the line. The income jump will follow naturally.
Spending Priorities and Worker Economics
A city that earns a lot can still go broke if it spends unwisely, and the V0.1 beta has a few well-known budget traps. The first is over-building production chains before the workforce is large enough to staff them, because idle factories still cost upkeep. The second is upgrading military too aggressively in the first hour, which starves the commercial side of the workers it needs to staff the shops. The third is ignoring the wage line, because citizens who go unpaid stop spending and eventually leave, which drains both the population and the income. Managing wages well is one of the more underrated skills, and the wage and spending priorities breakdown covers the exact order in which the beta economy tends to reward each upgrade.
| Spending Priority | Effect on Income | When to Spend |
|---|---|---|
| Worker wages | Keeps citizens spending and producing | Always, before any expansion |
| Apartment upkeep | Maintains population growth | After at least one commercial building is online |
| Service buildings | Raises spending per visit | When happiness starts to drop |
| Defense upkeep | Prevents income loss from raids | After the commercial stack produces a buffer |
| Factory expansion | Lifts production throughput | When workers exceed commercial demand |
The order matters because the earlier items on the list protect the income, while the later items expand it. Spend in roughly that order and the city grows smoothly; spend in reverse and the city slowly bleeds cash until the next attack finishes it off. For a deeper look at the worker side of the equation, the worker management guide explains how the production tab interacts with the commercial side and where most players end up with too many workers and too few shoppers.
Resource Balancing for a Stable Income
Income does not exist in isolation, because every shop needs a road, every apartment needs power, and every factory needs water. A city that ignores the resource balance ends up with buildings that earn nothing because they are unpowered, unwatered, or unreachable. Players who keep the resource triangle balanced tend to out-earn players who pile up commercial buildings on a single resource line, because the moment one of the three resources fails, the whole chain stalls. The power and water balance guide is a good companion read for this section, because it shows how a stable resource base quietly multiplies every dollar the commercial stack produces. Treat the resource triangle as a fourth pillar of the income strategy and the late-game economy becomes much easier to manage.
Military Pressure and Defensive Spending
Every economy in Build and Conquer has to coexist with the war layer, and ignoring the military is the fastest way to lose the income you just built. Defense spending does not produce cash on its own, but it protects the cash flow from raids, and community testing suggests that a single successful attack can wipe out several in-game days of income. The trick is to spend just enough on defense to keep the city safe, and no more, because overspending on garrisons and watchtowers drains the budget that fuels the commercial stack.
| Defense Tactic | Cost Profile | Income Protection |
|---|---|---|
| Watchtowers | Low | Deterrent only, weak protection |
| Garrisons | Medium | Reliable against small raids |
| Perimeter walls | High | Strong protection, slow to build |
| Air defenses | Medium–High | Counters late-game threats |
| Squadron patrols | Variable | Mobile defense, flexible cost |
The table is a quick way to budget the next defensive upgrade without starving the commercial side. The general rule is to match defense spending to the size of the commercial stack, so a city that just placed its first supermarket does not need a full perimeter wall. Scale defense with income, and the economy stays healthy even during the heaviest raid waves. Players who want a more detailed breakdown of the military side can check the military and squadron guide, which explains how the war budget interacts with the rest of the economy and where most new commanders tend to overspend.
Common Income Mistakes and How to Avoid Them
Even experienced players fall into the same income traps during a new save, and most of them come from prioritizing one system at the expense of the others. The fastest way to stay wealthy in the V0.1 beta is to recognize those mistakes early and correct them before they drain the budget. The list below covers the most common pitfalls reported by community testing during the October 2026 beta cycles.
-
Building supermarkets before the population is ready: A half-staffed supermarket earns less than a fully used shop, so always check the customer count before upgrading the commercial tier.
-
Ignoring service buildings: Without parks, clinics, and other services, citizens grow unhappy and stop spending, which collapses the income line even when the buildings are technically open.
-
Overbuilding defense too early: Military upkeep in the first hour burns cash that should be funding apartments and shops, so delay the heavy fortifications until the commercial stack is online.
-
Spreading commercial buildings too thin: Scattered shops serve scattered customers and earn less than a tight cluster, so build the commercial core in one place instead of across the map.
-
Skipping the resource balance: A shop that loses power or water stops earning, and the income loss is invisible until the budget screen turns red.
-
Forgetting the War Budget line: Defense spending shows up in the budget panel, and a city that ignores it can look rich on the income line while actually running a deficit.
-
Letting the city level stagnate: Hitting the next tier unlocks new commercial buildings, so a city that stops growing population eventually hits the income cliff described earlier.
Correcting those mistakes is usually cheaper than starting over, because the fix is almost always a small rearrangement of the existing buildings rather than a brand new layout. Take a screenshot of the budget panel, identify the line that is bleeding cash, and address that one issue first. Most cities recover within a few in-game days.
Frequently Asked Questions
What is the fastest way to make money in Build and Conquer?
Drop a shop, queue two apartments next to it, and place a second shop adjacent to the first to double-dip on the same foot traffic. Community testing shows this opening produces a positive cash flow before the first attack lands, which is the foundation for every later upgrade.
Which building makes the most money?
The mall earns the most per tick, but only after the city reaches the tier that unlocks it and the population to staff it. Until then, a tight stack of supermarkets is the highest reliable earner and outperforms any single high-tier building placed too early.
How do I unlock passive income routes?
Build a mall once it is unlocked, surround your commercial core with service buildings, and stabilize happiness so citizens keep visiting. A defended commercial block with happy citizens runs almost itself, which is the closest the V0.1 beta gets to true passive income.
Do workers affect how much money I make?
Yes, because every commercial building needs workers to operate, and understaffed shops earn a fraction of their potential. Pair the commercial stack with a steady worker pipeline from the production tab to keep the income line moving, and avoid pulling workers into defense until the budget has a buffer.
Can I keep earning money during a raid?
You can, if the raid is contained to a small section of the map and your commercial core sits behind a defensive perimeter. Players who separate the war front from the shopping front tend to keep earning even during heavy attacks, while cities that mix the two systems lose income the moment a raid breaks through.